Sometimes things go wrong. Even on the simplest of projects, things go wrong. But the upside of having a failure is that it can turn into a teaching moment. This prop, even though I thought it would be super simple, would ultimately turn into one of those teaching moments in my quest for making things.
Finding the prop
While I was watching Yankee Doodle Dandy, I was keeping an eye out for the perfect prop to make for my 100 Movies, 100 Props project. For a majority of the movie, the props that are being used are not something small and easily replicable in my garage with the set of tools I have. Most of the unique items in the movie consisted of the set design and large stage elements that I simply don't have the means of replicating.
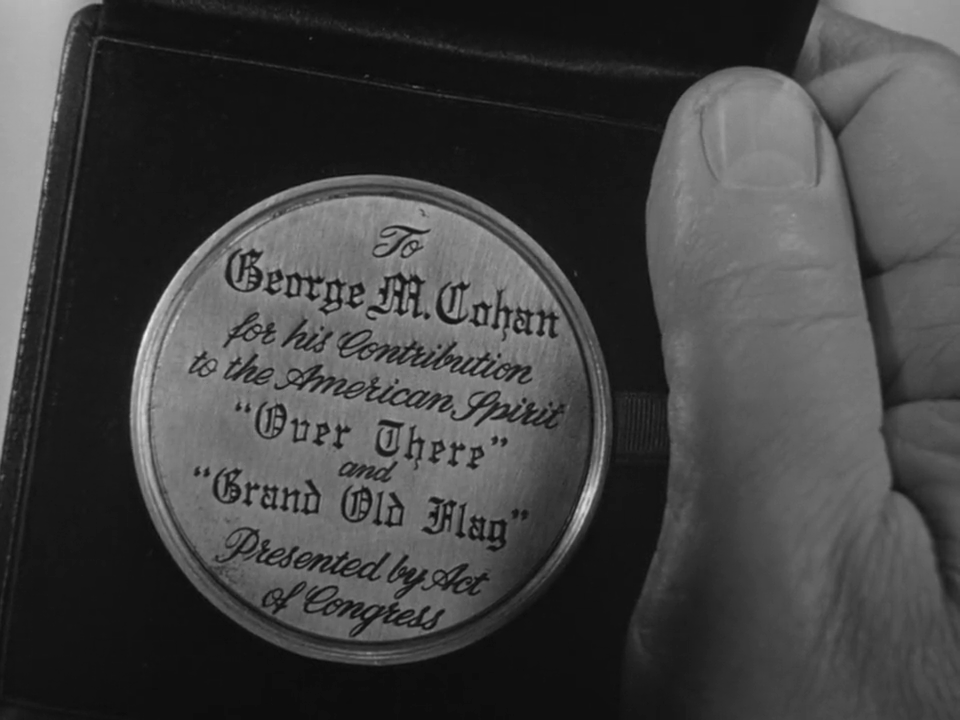
That is until Mr. George M. Cohan received the Congressional Medal of Honor in the movie. It came down to the end of the movie to find the perfect prop but boy oh boy did I find one. This prop was something small that would be able to use a tool that I haven't used yet during this project. My K40 laser cutter!
On laser cutters
I want to take a brief moment to talk about the virtues of the K40 laser cutter. Most laser cutters cost several grand to own one. This one does not. When I was originally thinking about getting into the world of laser cutting, I had seen a bunch of ads for the Glowforge. What once was a very industrial tool now looked like a consumer grade tool that you could plug and play and get busy cutting. The folks over at Glowforge managed to get the technology to the point that you could even use the laser cutter indoors in your own office. It sounded too good to be true.
Unfortunately, it was. When I finally mustered up the courage to go to their website and start making a purchase, I thought I could maybe swing the purchase price with enough savings. To figure out how much tax and shipping was going to be, I went through the process of checking out with the laser cutter in my cart. All the way up to the final submit button.
That’s when I realized that the shipping and handling was going to kill me.
In fact, when I was doing my research on laser cutters, I read about a bunch of different laser cutters. And there was another cutter that would be about the same price as the Glowforge's shipping alone. That laser cutter would require a whole lot more setup and tinkering but it was a fraction of the cost of the Glowforge. That laser cutter is the K40.
Now, the K40 is janky. There's no way around that. You can order the cutter on eBay and it is shipped from mainland China direct to your address. It's the largest laser cutter that you can get shipped by way of FedEx or UPS without requiring a huge freight truck delivering the cutter on a pallet. I figured a freight delivery would probably be a struggle given that I'm currently living in an apartment complex.
When I received the cutter, I knew that I had to put in a lot of work before I even attempted firing up the cutter for the first time. I'm happy that I did the research on this beforehand.
You see, the K40 typically gets shipped to you without proper grounding. What that means is that the electrical circuits aren't wired up correctly. The consequences of not properly grounding a device like the K40 are potentially deadly. The machine draws a lot of power to fire the laser beam that can cut through materials like wood or acrylic with just the power of focused light. If there were excess energy in the system because of a fault in the electronics, typically that would flow to a ground wire that would discharge the excess energy into, you guessed it, the ground. Without proper grounding, that electricity could flow through the metallic body of the K40 and if you were to touch it, the energy would now flow through you. Suffice to say, this would not be a pleasant experience.
So the first thing I did was find where the ground wire was connected to the main body of the cutter and notice that the ground was not making contact with the metal body as it should be. Instead it was making contact with the blue paint that covered the body. This is not good. But the fix was simple. I unscrewed the ground wire, used my dremel to remove the paint around the screw, and screwed the body back together. Using my multimeter, I was able to confirm that the machine was now properly grounded.
The next step is making sure that the smoke generated by the machine is properly vented. If you're cutting wood with the machine, you're just burning a hole through the wood with the laser. When you're burning this hole, it smells like burnt wood. The same goes for any other material in the machine. When you're in a closed space like a rented one car garage, you want to make sure that you're properly getting rid of the fumes that the machine is generating. So, I used some simple duct material that would more commonly be located on your dryer in the laundry room with the help of a decent in-line ventilation fan from Amazon, and I was able to vent the fumes out of my garage to the outdoors. To make sure my neighbors don't hate me, I also threw on a large air filter on the end of the duct work to try and cut down on the smell.
Lastly, I had to make sure the actual laser tube that fires the laser doesn't overheat. That's as simple as getting a large tub from Home Depot, filling it up with distilled water from Walmart, and attaching an aquarium pump to feed that water to the laser. Easy peasy compared to everything else.
With all that extra work, I'm now in business with a laser cutter that is comparable to a Glowforge.
Actually making the prop
Now, I had some extra acrylic laying around the shop from a previous project and I figured that would be the perfect material for cutting out the Medal of Honor. The acrylic sheets I have would be thick enough to look like a nice solid coin but are also easy enough to cut and engrave.
So I took to Illustrator to replicate the Medal of Honor from the movie. Luckily, there’s a fantastic up-close shot of the Medal of Honor right when George M. Cohan receives it.
I took this into illustrator and started drawing up a circle for the cutter to cut out and a circle for the laser to engrave to give the effect of the raised edge on the coin.
Next, I started digging through the font library on my computer to find the perfect fonts to replicate the actual words on the Medal of Honor.
I quickly found the old-timey font but the script font would be a lot harder to find. Honestly, I think this may have been done by hand back in the day when they were designing this prop. For sure it wasn’t computers just based on the age of the movie. But I wondered if they had a typeface that they could use for punching out the words and if they had a script typeface that made up most of the words on this award.
In the end, I ended up going to Google Fonts to find a free font that I could use for the prop. It’s pretty damn close but the A’s are slightly off. But that didn’t bother me so much. This was officially close enough for my tastes!
Cutting the prop
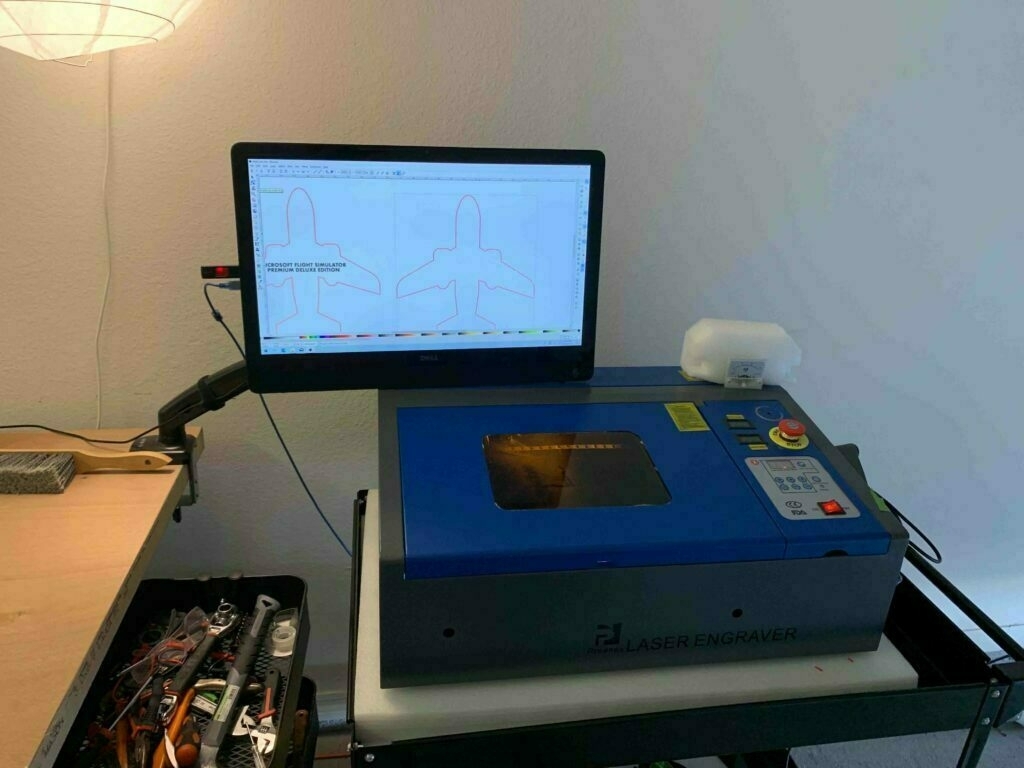
Actually bringing the prop to life was dead simple. I saved my graphic from Illustrator in a format that can be read by the laser cutter (SVG) and ran over to the shop.
I fired up the laser cutter with the attached computer, loaded in my file, placed a sheet of acrylic inside the cutter, and cut.
Like I said, super easy.
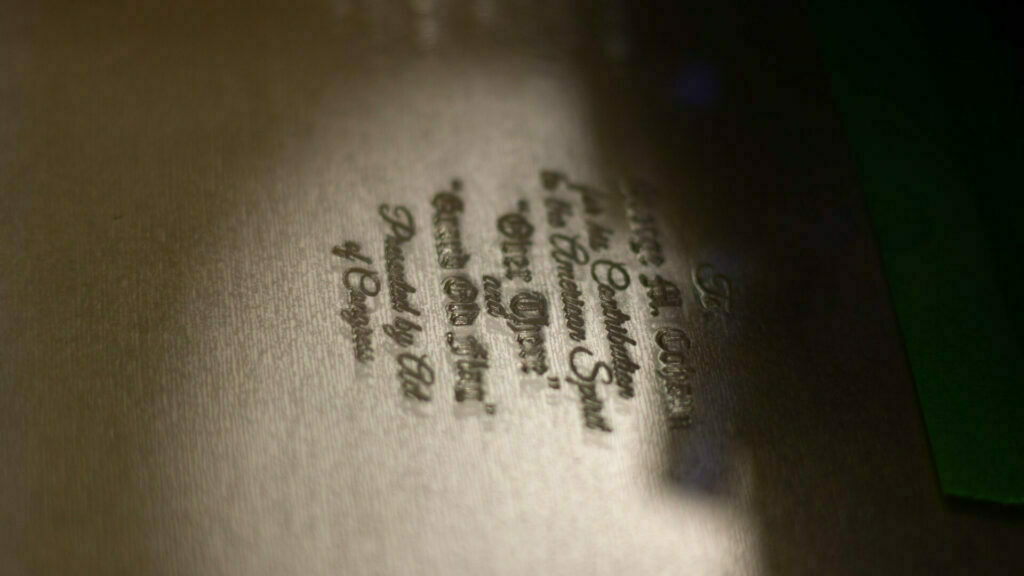
In a few minutes time, I had a recreated version of the Medal of Honor in clear acrylic and the words on the front of the medal were engraved into the acrylic and has a nice frosted effect to it.
Now it was time to make the medal gold. Even though the film Yankee Doodle Dandy is in black and white, I figured that this medal would probably be gold.
Luckily, I had the same gold paint that I used in my first prop project on this blog and was able to use my airbrush and spray the acrylic to a nice shiny gold.
Next I took some black acrylic paint to make the letters on the medal pop so you can actually read the words without having to move the replica medal around in the light.
This is where I ran into problems and ultimately wasn’t satisfied with the route I took.
I used the black acrylic paint and some water to try and fill in the letters and then used a paper towel to wipe off the excess paint and hopefully just leave black paint inside the letters.
It worked for the most part but it also covered the medal in a slight layer of black paint that looked very grimy. That wouldn’t do. This was supposed to be the highest award one can receive from the United States Government, hand-delivered by FDR himself. This couldn’t look grimy!
I tried to clean up the excess black paint as much as possible and started to try to repaint the medal but I just couldn’t get it to work.
New materials
This is when I decided to take a break in the shop. I was frustrated because the whole project was going so well until I got to the very last part. It’s the same thing that happened with me on the Toy Story project. I was incredibly satisfied until it came down to the FINAL steps! I didn’t want to have this happen again.
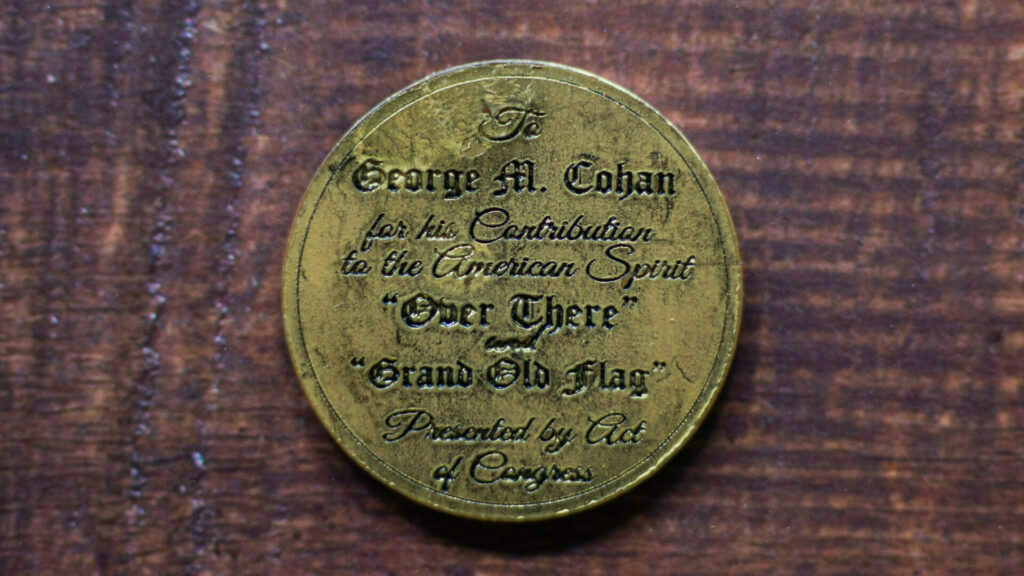
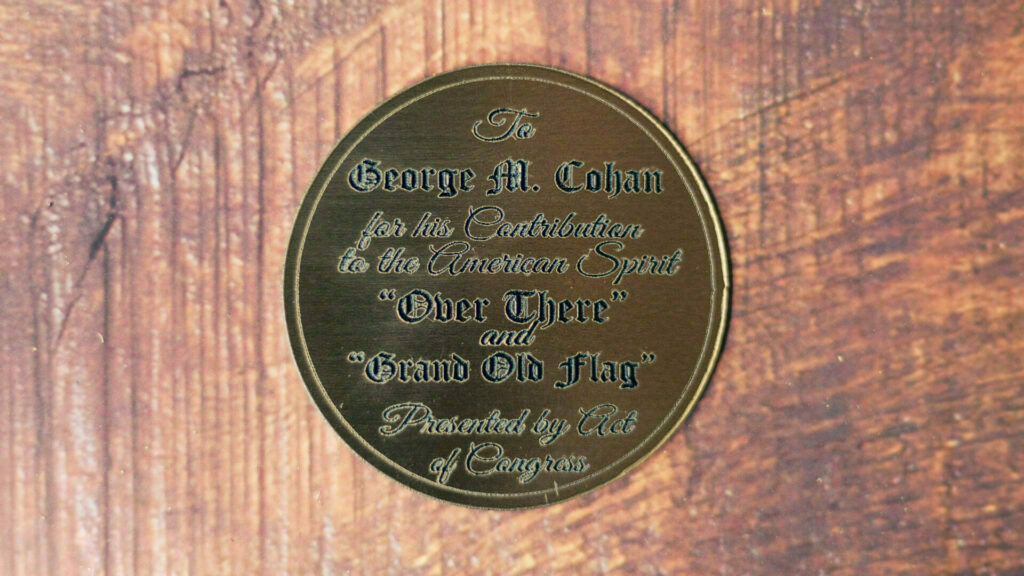
That’s when I discovered something new. A channel I follow on Instagram started talking about something called Flexibrass. It’s a lightweight plastic that resembles metal and is laser safe. Most importantly, when you etch it with a laser, the etched parts turn black. THIS WAS PERFECT!
I found a material that would already be the shiny material that I wanted my prop to ultimately look like and the engravings would already be black instead of having to fiddle with acrylic paint and keeping the whole thing looking clean.
I quickly ordered a sheet of this material and waited for it to be shipped to me. USPS had a delay in the shipping, which I was warned about due to the whole pandemic, but I finally got the sheet this week.
Again, I took my design over to the laser cutter in the shop. Fired it up. Loaded up this new sheet of Flexibrass and cut and engraved the medal.
And I’m so happy with the final results!
A medal fit for George M. Cohan
I keep sitting here looking at the finished product and I’m amazed with it.
Even though I was really upset when I had the initial failure in my project, I’m ultimately happy that I did run into that roadblock. I was able to learn about a new material that I had never heard of before and it’s a material that I can definitely see coming in handy in the future.
After all, that’s the whole reason I started this project. I wanted to learn more about the tools in my shop and learn more about making by actually making things.
If you wanna keep up with this blog, feel free to follow my Instagram where I regularly post to keep you updated.
If you wanna support the blog, you can click on the “Buy me a coffee” link to help build a fund for purchasing new materials and tools to keep this project going!
Thank you for reading!